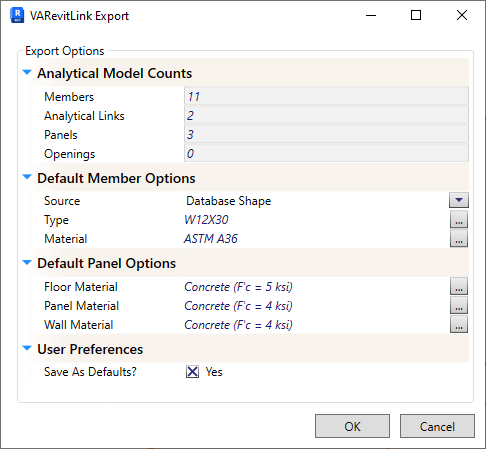

Selecting the option with an active Revit project will allow you to generate a .vap file to be used in VisualAnalysis. The Export Dialog is shown in Figure 2, and will become active when the Export command is chosen.

Figure 2: Export Dialog
| Analytical Model Counts |
Displays a summary of the items in Revit’s Analytical Model. |
| Default Member Options |
This information will be used when an analytical member cannot be matched in VA. Source: The member source to use for Revit members with undefined sections or sections that cannot be matched. Type: The member section type to use for Revit members with undefined sections or sections that cannot be matched. Material: The default material to use for Revit members if the defined material cannot be matched. |
| Default Panel Options |
This information will be used when properties of an analytical panel cannot be matched in VA. Floor Material: The default material to use for Revit panels with a Structural Role = 'Floor' if the defined material cannot be matched. Panel Material: The default material to use for Revit panels with a Structural Role other than 'Floor' or 'Wall' if the defined material cannot be matched. Wall Material: The default material to use for Revit panels with a Structural Role = 'Wall' if the defined material cannot be matched. |
| User Preferences |
The options outlined above can be saved to a User Preference file that will persist these values from session to session. The default value is 'Yes'. |
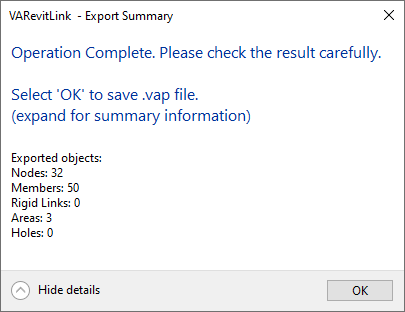
After the Export Parameters have been set, select OK to save a .vap file of the project. After the .vap file is created, a Summary of the Export operation will display, similar to the one shown in Figure 3 below. The Summary will note the members and areas that were exported, as well as those that could not be exported, if any.

Figure 3 - Example Export Summary
In an attempt to facilitate cross-referencing the VA and Revit model, members created within VA will be named as follows: